Monday, August 30, 2010

Chalkboard for the Entry

Each week my house starts to come together a little bit more.  I am almost finished with our entry way and will reveal all the pictures of it soon.
I had an old painting that I picked up at a garage sale in my parents basement that had a really big frame. I tore off the exterior of the frame that was covered in some fabric because it came out from the wall strangely (sorry no picture since I was so happy to rip that part off). You will see the canvas that I rescued from the frame in another post.

I had some leftover 1/4" birch plywood from one of the many projects I've recently made. I just cut a piece to fit in the back of the frame where the canvas had been. I painted the board and sanded and painted with chalkboard spray paint but didn't get a great result. I think the fine grain of the wood was still too much.
I painted the frame out in a pale blue and distressed it very lightly.
You can see the how the grain shows after chalk gets in it. It looks worse in the picture than it does in person. It actually gives it an old rustic look.

Thursday, August 26, 2010

Old Couch....Fresh Start!

In our new house I have been going for a cottage look with a slight beachy feeling. So far the slip covering the couch has made the most impact. I keep surprising myself when I walk into the living room.
Here in the picture of me working on the couch you can see the old upholstery fabric. It was pretty but not the look I wanted anymore. The couch is good quality so I decided to make my first serious slipcover. I also am doing a chair so I ordered 25 yards of white bull denim and 50 yards of welting cord!
Another picture of the progress. You can see the cushions finished and sitting on the leather love seat.
I had to take a picture of the most challenging part of the whole couch (other than the zippers in the back). This little dart had to be made to fit the corner and it took me a long time of adjusting to get it right.
Here the couch is all covered!
I should also warn you that this is a "do at your own risk" project. I kept catching my fingers in the pins as I sewed and the sharp metal upholstery zippers really sliced my finger when I was stuffing the cushion.
I definitely left my mark on the fabric. Thankfully it is white and it will bleach out. There are several little tiny spots as well from pricked fingers. I think I went through a whole box of band-aids during the construction.
Even before I had the slipcover fabric I had this great coordinating decorator linen that I had picked up at Hobby Lobby. It is wonderful! It is distressed looking and oh so drapey. Much nicer than the stiff upholstered pillows we had.
I have to say that this has been the most difficult sewing project I have ever completed. Mostly due to the heavy weight of the fabric, the welting, and the sheer size of it.
The chair is in progress so stay tuned for pictures of the living room as it improves!

Go check out the party!

Monday, August 23, 2010

Kimono Belted Dress

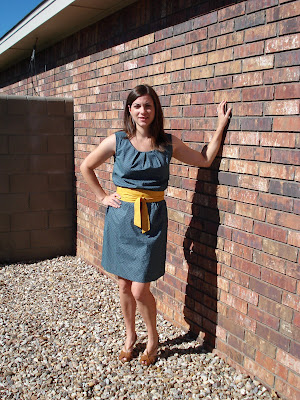
I finally got around to sewing something for myself to wear. This is a dress and belt  made from New Look pattern # 6803. It came together quickly and was easy to adjust. I ended up taking in the side seam from the underarm to the waist to give it more definition but it still had to be able to slip over my head. This might not be the best style for someone short waisted like myself but oh well.

You'll have to excuse the squinting eyes. I wanted the pictures taken before church when I was in a non wrinkled state we were in a bit of a hurry.

Wednesday, August 18, 2010

School Skirt

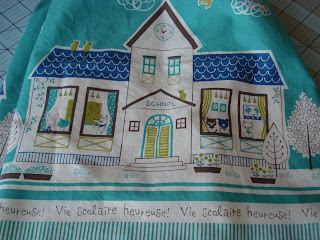
My oldest niece is starting Montessori school this month. I had picked up the perfect school themed fabric in Japan. It is going to be a longer skirt on her little petite frame but I puposefully left it longer so she can wear it for a few years.

Monday, August 16, 2010

A new friend

A few weeks ago I received a great package in the mail.....a friend for my sewing machine!  I finally received my serger that had been backordered for months. Don't they look good together?
I decided to try out the low budget Magnolia serger that Janome makes. I was able to purchase it for less than $200 and it shipped for free. That price is hard to beat. So far it seems to be fine for what I need.
So far I have only used it to finish seams but haven't used it to sew knits or anything else yet. I wanted to be able to sew knits more easily and be able to finish of the seams in my garments more professionally.
I was thrilled to see the nice edge on this little scrap on my first test drive.

Tuesday, August 10, 2010

Gifts for Baby Ely

My dear friend Kristi is having her first baby. I am so excited for her! Although I couldn't make it to her baby shower I wasn't about to let the chance to sew sweet baby gifts pass me by. These are just a few of the things I sent to her. I forgot to take pictures of everything before wrapping them up.
A soft blanket and little shoes.
Japanese pastoral scene fabric. It is a lightweight twill almost, soft though. The back is velour fabric and extremely soft, rub on your face just to double check soft.
A hooded towel and matching washcloth sewn out of Alexander Henry fabric and green terry towels.

Wednesday, August 4, 2010

Ruched Pillow Tutorial

I had an idea for a while to make a ruched pillow for our bedroom. I have it shown on our guest bed in the pictures but that is only because the lighting is better.
First you need a pillow. I happened to find these rectangular pillows that were $3 each at Wal-Mart and marked as travel pillows. The pillow is 14 "x20". You can use whatever size you want though.
You need to measure the length and width of your pillow.
L=20"
W=14"
To get the measurement for the front piece I added 1 inch for seam allowances and then doubled that number. So 21x2=42". The width will be 14 plus an inch for seam allowances. That means I needed to cut a piece that was 15"x42". The pieces of the back will form an envelope closure so you need to allow for that. My width measurement will remain at 14" but the length of the envelope pieces will be 15". This allows for hemming the edge of the envelope pieces and for a generous overlap.
Next you need to hem the back pieces so they will not ravel and will have a finished look. Start by folding the edge over 1/2" and pressing in place.
Next turn the 1/2" pressed edge over again to enclose it and press.
Here it is pressed and pinned to sew. Sew close to the edge to secure.
Next you need to gather the piece of fabric that will be the front. To do this adjust your machine to do the longest length stitch you have. For my machine this is 5.
Stitch the entire length of the long edge of the fabric 3/8" from the edge, repeat again 1/4" from the edge. Do the same on the other long side of the fabric.
Now you need to pull up the gathers using the bobbin thread until the piece measures 21 inches. I had it on my cutting board to determine the length but you can just check it with a tape measure or ruler as well.
Adjust the gathers so they look evenly distributed.
Now you need to finish preparing the back piece. Lay the pieces down overlapping them so they are measuring 21" in length.
Pin the area where the pieces overlap and stitch the edge between the pins to hold the pieces in place.
Now it is time to put the front and back together. Make sure the back piece is turned the right way so the envelope edges will have the nice side showing. (This is your warning, I didn't double check so mine has the wrong side showing on the back). Pin the pieces together and stitch together using 1/2" seam allowance. If you plan on washing your pillow cover in the future you should either serge the raw edges or use a zig zag stitch.
Turn right side out and insert your pillow. You can see my blue pillow stripes showing through slightly since my linen fabric is quite transparent. I need to sew a white cover to help hide them.